Wednesday 16 September 2015

Best on You Tube - Autumn Make Up Looks


Hello everyone, presenting another best on YouTube make-up blog post. Autumn is already here (at least in UK with all the leaves starting to fall) and YouTube is flooding with the seasons make up looks from various make-up artists and bloggers.

For some reason I do not know why make-up for Autumn season has always been associated to shades of reds and berry like dark red, maroon, burgundy, dark orange and various other related shades. But this year I am seeing bloggers and make-up brands pushing forward other subtle colours as well.

Check out the top 3 make-up looks I have liked so far and would be great for an Autumn night out/day.


Autumn Makeup


Autumn Makeup Autumn Makeup Autumn Makeup

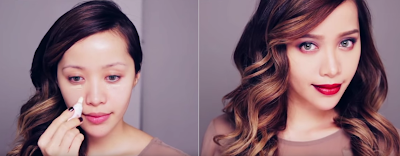
1. Autumn Ombré By Michelle Phan

This video dates back to 2013 but it came up in my recommended list. The blackish dark red lips look just wow. If you are not sure you could apply such a bold colour on your lips, a nude colour would be just perfect.


What I Learnt:
1. Applying rose gold liner instead of white liner on lower eye waterline brightens the colour of your eyes. 
2. Applying pencil liner instead of liquid liner gives a more softer look.

Substitutes:
1. If you don't have a brow kit for filling your eyebrows, a pencil or eye-shadow matching your eyebrow colour would also work.
2. If you don't have a navy blue colour eye shadow, no worries, you can use a dark purple or dark green colour as a substitute.
3. If you are going out to eat, avoid applying the blue eye-shadow on your lips. Having lipsticks on your lips while eating is already not good and on top of that if you apply a powder eye-shadow(even if you blend is nicely) it would be not such a great idea. Do avoid it while eating.


2. Burberry Runway Make-Up Tutorial: How to Create the Autumn/Winter 2015 Look By Burberry's Make-Up Artistic Consultant Wendy Rowe 

This look is presented by make-up brand Burberry and it compliments their AW2015 collection. A sleek chic look, you can pull this off for office or formal lunch/dinner.


What I Learnt:
1. Applying contour to eye socket enhances the depth of eye and gives a very natural shadow.
2.  Dotting the lower lash line with Kajal pencil/liner instead of drawing a line helps in getting a more softer look and easily smudges with a brush/cotton bud to give the smokey eye effect.
3. Setting Kohl pencil line with eye-shadow will make sure the colour doesn't smudge and stays on longer.

Substitutes:
1. If you don't have a face contour palette you can try using creamy brown eye-liner or light brown lipstick under the cheekbone and eye socket for contouring to give a soft finish. You can also use brown eye-shadow or non shimmery bronzer for same. Note, powders give a different effect than creamy combinations.
2. If you don't own a nude lipstick try a mix of light pink & brown depending on your skin tone.


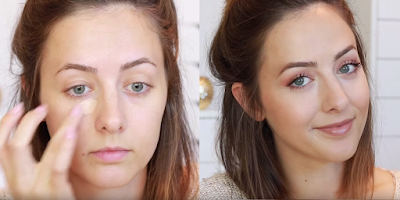
3. Everyday Fall Makeup Tutorial 2015! By GettingPretty

A simple everyday easy to apply make up look! This look is best for any day out occasion like shopping, coffee with friends or even a date if you are running late or like to keep  your make-up minimal.


What I Learnt:
1. Applying concealer first to dark/red spots and then applying foundation to the rest of the face will help in maintaining the brightness of concealer.

Substitutes:
1. If you don't have brow gel to set the eyebrows after you have filled them, just use Vaseline instead. Rub very little amount of Vaseline between your fingers and very lightly press it on your eyebrows.

Let me know which one is your favourite and if you find another lovely autumn look on YouTube.


-- Teju


Friday 10 July 2015

Best On YouTube - Puffy Eye Make Up Looks + Tips

Ever woke up with a big puffy bags under your eyes?? I did couple of days ago and it felt as if someone had injected my eyes with water. I needed them them to go away. As usual I was running late for work & I had no time to make them disappear naturally so had to depend on makeup. I had previously seen the 2nd and 3rd video in this list for puffy eye make up tips and all I had to do was combine them with a little tweaks and I was sorted. My work for the day was done but I was not satisfied with the number of tutorials or looks that were available on youtube. There are N number of makeup tricks available on YouTube on how to cover up your under eye bags and trust me they are good. I mean really good. 

But my aim here was to find the best looks and tutorials which cover both aspects. The puffy eye coverage and the over all look. 

After days of browsing/searching I have the list of the YouTube tutorials/looks to mask puffy eyes (or get them to your use!) along with the full face makeup which will enhance other features and make you look amazing as always. 


Major reasons for puffy eyes is less sleep, crying(a lot) or sometimes even genetic.

These tutorials/looks are based on how to mask your under eye puffiness using makeup. Makeup is not a remedy. Its only a temporary work around till you get enough time to reduce them naturally(by getting a good nights sleep, minimize the stress, exercising, keeping yourself hydrated, cutting down salt) or organically(using below mentioned remedies).
(Click on the photos to go to the videos)

1.This look is by MarinaSays. I think its best suited for mornings and can be easily achieved in 5-10 minutes. She starts the video with tips on how to reduce puffy eyes and then gives the makeup look. So unless you want to see the organic tips, the makeup is from 02:20.
This look definitely boosts your confidence and makes you look cheerful even if from within you are not :)


What I Learnt:
1. Dabbing concealer under eye instead of rubbing/sweeping it stops your eyes from being more irritated.
2. Less sleep/over crying can also have an effect on lips so applying a hydrating coloured lip balm/crayon will nurture your dry lips.
3. Avoiding eyeshadow or applying a single layer of matte eyeshadow will help because your eyes are already so stressed out.
4. Concentrating mascara application only on outer lashes will help in giving eyes an open look.
5. Using a bronzer instead of blush helps in keeping the redness away from face 

2. When I had searched for puffy eye makeup looks, the only immediate look I found was of famous blogger Michelle Phan doing a puppy eye(happy eyes) lookInstead of covering your under eye puffiness this look actually uses it to your advantage. To be honest I was a bit taken aback by the eyes, but apparently puppy eyes (which originated in Korea I suppose) has become a huge trend all over. Play along with different shimmer colours if you are not sure how the shimmering white will look.


What I Learnt:
1. When applying shimmering eyeshadow, its best add a hint of matte powder on face so that the concentration stays on eyes.
2. Applying thin eye liner on outer edge of upper eyelid helps in achieving the cute puppy eye look.

3. Another puppy eye look, this time its by bubzbeauty . This one will suit most of the skin & face types. Its more of a night time look since you get a smokey bold eye effect along with beautiful gradient lip but it can definitely be worn in the day as well. Its takes more than 15 min to get this look, but worth the time.


What I Learnt:
1. Applying mascara to lower lashes first prevent them from smudging.
2. Applying dark brown eyeshadow or contour below lower lash line helps in giving a deep set eye effect.

Makeup tricks I learnt to cover under Eye Bags:
  • Use concealer just where the under eye bags leave shadow and near the tear duct.
  • Use ring finger to apply any cosmetic on and near the eye. Ring finger has the minimum pressure as compared to rest of the fingers.
  • Hydrating eyes (both upper and lower eye) before applying any sort of eye makeup is a good practice. Any dryness near eye will make product look more visible.
  • If you eyes are really feeling tired, avoid using powdered eyeshadow and use gloss or cream shadow.
  • Try to focus more on lip colour by doing a gradient lip or a bold red or pink lip.
  • Avoid mascara on upper eyelash if you are already feeling very sleepy or have cried a lot. Your eyes have already suffered. Putting mascara weight on eyelashes will make you feel more droopy.
  • Fill in your eyebrows to get a defined face.


Non Makeup tricks I learnt to reduce under eye puffiness:
  • Placing cold brewed tea bags/Cucumber slices/Potato slices on eyes can be very helpful.
  • Placing the round side of a cold spoon on under eye bags can help in shrinking them.


For more in depth understanding on under eye puffiness and its remedies, Lisa Elridge has all the answers !


Hope you had a good time reading this. Do let me know which one was useful to you and if you find any more good puffy eye makeup looks please share. Your suggestions are more than welcome :)

Thursday 25 June 2015

Best On YouTube - Dinner Date MakeUp Looks

Listing down my top makeup looks/tutorials for a date night. A date night requires a make up which is not overly done but is still something which will make you look more beautiful and enhance your features. You generally tend to sit close to someone and they can clearly see your face so my suggestion would be to avoid a full coverage foundation to avoid the layer effect. Keep it eye catching but not too bold.

My favourite top 4 looks are..


Take you pick..
1.I love Lisa Elridge makeup looks. The way she explains and does an amazing makeup, I think there is no way you can't love her. No doubt she's present in all my best of YouTube makeup lists.


What I learnt:
1. Tracing eye pencil/shadow upwards on lower lash line helps in getting an uplifted eye look.
2. A lip colour giving stain is good for this kind of occasion(since you are going to drink n eat !)
2. Lip lining with a lip pencil or liner after applying lip colour is a good technique to give a plumpy effect.


2. The second  look is also by Lisa Elridge. Again, an instant likeable makeup look. Its more soft glamorous type of look with shades of peach and an amazing lilac eye makeup.  I think the photo is enough to get impressed.


What I learnt:
1. A pale shade of foundation (instead of pink) matching you skin colour  helps in masking redness on skin, if any.
2. Place a tissue under your eye while applying darker or sparkle eyeshadow to avoid getting any dust on to cheeks.


3. Well the next look is by blogger Karima McKimmie.
Recently found her on YouTube and when I went through her blog I was really impressed by her make up looks. This look goes a bit bold on the eyeliner and subtle on lips. If you are not a fan of long winged liner(like me) don't elongate it too much and keep it simple !


What I learnt:
1. Applying a flesh tone eyeshadow before another colour gives different look.
2. Adding shimmer eyeshadow on the eye ball on upper eyelid gives a twinkling effect.
3. For easy cleaning up any fall out from mascara or eyeshadow use a cotton bud dipped in face cream.


4. If you are not a huge makeup fan and want to avoid any kind of bold lip or eye but still want some make up on your face, this one's for you. Its a more like a girl next door look. Looks simple yet elegant. I like the way her eyes and lip colour compliments each other and is perfect for a romantic evening.


What I learnt:
1. Go for a foundation giving glow effect instead of matte.
2. Cover spots with concealer with a finger instead of brush.
3. Blend the gel eyeline liner with brush to get away with harsh lines and give a subtle smokey effect.

Some other things I learnt from other tutorials:
1.Use a tape under the eye to get an edgy kind of eye shadow look.
2. Apply white kajal//liner in upper eyelid for shadow colour to stay on for longer time

Other looks that you can try out..

Delani Lewis


Allana Davison


Kaushal Beauty


Claire Ashley


Wednesday 17 June 2015

Best On YouTube - 5 minutes make-up tutorials/challenge

Getting ready in less time and specially putting on some decent make-up amid haste seems like an unachievable task to many. No need to panic. There are many 5 minute make-up tutorials on you tube and I am more than excited to list down the BEST 3!!

Finding the best three wasn't easy. After watching so many videos it really takes something very interesting and grasping for hold on to and watch till the end. I have tried on all the three looks and trust me they are really time savers and look great! I am sure you will learn something new from each of the tutorial.

Some of the make-up products and tools used by them are quite expensive and not everyone can afford them. But so what, that shouldn't stop us from applying make-up. But, please be very careful while selecting the type & kind of product or brushes. Not all make-up brands and brushes suit everyone. Remember each skin is unique and adapts differently.


1. The 1st video I really like is by blogger ViviannaDoesMakeUp. I have been following Anna for some time now and love the way she explains everything. The video quality is good and though she is not a professional make-up artist, her make-up tips and ideas are amazing. 
She did actually set a 5 minute timer. 

Go on. Hit the play button!!


What I learnt? 
1. Set your preferences on what product you want on your face.
2. Using creamy eye-shadow is the best bet when you have less time.
3. Have all the products ready in front of you.

Best Suited For: Most suitable during mornings, either for office or a day out.


2. I found this video after a lot of searching on you tube. It’s by renowned makeup artist Lisa Eldridge. I like the way she added a hint of colour on her eyes and still not look over done. The video is for more than 5 minutes, but I think it’s because she explains a lot in between. If done without any distraction, this look can be achieved in 5 minutes. She used a purple like colour on her eyes, if you don't have that colour, play along with whatever poppy shade you have. 


What I learnt? 
1. A party look can also be achieved in 5 minutes.
2. Using a bright shade on eye and not using a blusher or dark lip colour can still uplift your face and be sufficient, or vice-versa !

Best Suited For: A night out or party (if you really have no time to get ready or your sidekick gets very impatient when you take out that make-up kit ;)

3. The video is by MissJessicaHarlow. The idea is to get a fresh looking face no matter what the weather or occasion. It’s simple and easy to follow.


What I learnt?  
1. That foundation is the most important part of any make-up routine and needs to be given enough time.
2. Applying eye brightener gives a good photo finish look.
3. For hooded eyes, use a brown/grey eye-liner so that it doesn't mix up with your lashes and doesn't make your eyes look smaller.

Best Suited For: Any time of the day. If you are feeling low and sad, try this look out. It will definitely make you happy (at least for some time :) )

Take your pick. Let me know which one is your favourite. Any suggestions are more than welcome :)